Translate

Friday, March 7, 2014

Tag Topper Fancy Fold


We made this card at February's Club meeting. It's so fun! The tags are actually part of the card, not adhered to it. It doesn't take much time to make this style of card, and it's always fun to try a new fancy fold.

Cut your cardstock at 5 1/2 x 8 1/2. Mark 1 inch from edge of each short side, then slide into tag punch. Punch both ends so they will match up. Trim off excess around punched tags. Score one side so tag bends in. Put that side of card into trimmer at 4 1/4 and score card fold. Fold to match up tags.

We used the Banner Punch, Banner Blast set, Sweet Sorbet Designer Series Paper, AND Sweet Sorbet Accessory pack (Cantaloupe Twine) from the Sale-a-bration catalog. :-) Make sure you order your Sale-a-bration items before the promotion ends on March 31!

Inside, we stamped a bit of Gorgeous Grunge to make the white layer more interesting. The birthday greeting is from Itty Bitty Banners, with the matching framelits.


Product List
133551s
126257s
130514s
131298s
100730s
121045s
133521s
122925s
126983s
131176s
126980s
133324s
126889s
129267s
133519s
133522s

Wednesday, March 5, 2014

Watercolor Wednesday--with Sweet Sorbet


It's the last month of Sale-a-bration! Do you have all the FREE items you wanted???

This week's watercolor card features Crisp Cantaloupe and Sweet Sorbet Designer Series Paper (a Sale-a-bration choice!). There is a little bit of retired copper cording above the ribbon. For some reason, I'm loving copper with the Crisp Cantaloupe color!

To make the watercolor background, simply put a few drops of re-inkers down the middle of a clear block and spread the ink out with a wet aquapainter. I did find it worked better if I spritzed the cardstock too, before applying the ink to paper. Every card turns out differently and (almost always) beautifully, so give it a try!


Product List
126422s
102316s
131298s
121045s
133521s
131164s
122933s
131161s
101406s
130021s
119261s
103954s

Monday, March 3, 2014

Many Happy Watercolors

Who needs a little spring??? I know I do! There are crocus in my garden, but everything else is still pretty desolate. Spring stamping to the rescue!

This set, Happy Watercolor (p. 22 in the Spring Catalog), is so versatile! I needed a stack of cards for a church project, and this is what I decided on. Any sentiment--or no sentiment!--can be added as needed. They are stamped on Whisper White, with a variety of bright ink colors, then mounted on a Whisper White card base. I decided the card needed *something*, so I doodled a border. It gave the pop I was looking for. So here is my easily-mailable, all-occasion spring card!


What makes you think "spring"???


***************************


Product List
133191s
100730s
100082s

Thursday, February 27, 2014

Celebrate the chocolate!

These cute little candy holders hold 1 Ghiradelli square of chocolate. What a fun way to dress up a little treat!

Simple to make, too! Cut your cardstock 5 1/2 x 2. Score at 2 5/8 & 2 7/8. Punch the ends with a Tag Topper Punch--either Angled or Scalloped. Decorate!  These use the Sale-a-bration Designer Series Paper Sweet Sorbet and the Starburst Sayings Bundle. A few scraps of ribbon and twine, and they're ready to give away--or keep. :-)

Click the links below to view or purchase:


Product List
134818s
131298s
133521s
131176s
133324s
133522s
130021s
126877s
130911s

Tuesday, February 25, 2014

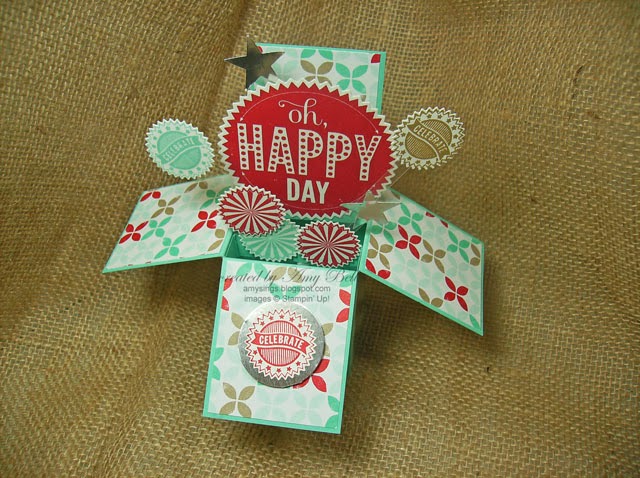
Happy Day Card in a Box


We made this card-in-a-box with the Starburst Sayings bundle at Club last week. There are tutorials all over the internet, and I sort of combined a few. :-) I wanted one that would fit in a standard A2 envelope, so I started with the cardstock 8 1/2 x 5 1/2. We scored at 2, 4, 6, and 8 on the long side, then turned and scored at 2 3/8. Heather Summers has a great tutorial here.

Here is how the card looks folded, ready to go in an envelope. You can see a couple little elements peeking out!


These cards are pretty simple to put together, even though they look complicated! I hope you'll give one a try!

Click to view or purchase items used on this card:

Thursday, February 20, 2014

Painter's Tape Birthday


We will be making this card tonight at my Stamp Club meeting. It was inspired by several cards I saw on Pinterest by Janine Rawlins of Australia. It's an easy and fun technique--just use strips of painter's or masking tape rubbed into ink pads, then press onto the cardstock. It makes a great background, and it doesn't require a lot of materials!

I'm loving that Hardwood background stamp! I wasn't going to buy it, but I've seen so many lovely samples, I couldn't resist.


Tuesday, February 18, 2014

A little envelope full of love


I've mentioned before that I'm trying to better at leaving love notes for my sweet husband. Our lives are so busy, we don't get to tell each other the sweet little things as much as we want to. This card started out with the tiny envelope! Another demonstrator asked for suggestions on how to make an envelope that would fit on a card front, and somehow my brain wouldn't rest till I figured it out. Which is a little odd for me, frankly. My brain tends more to words than numbers.

Anyway, to make a mini-envelope that is 1 7/8" x 1 3/8, start with a square of cardstock or Designer Series Paper (DSP) that is 3" x 3". Place it in the Envelope Punch Board at 1 3/8" and punch and score. Continue on by lining up the score line with the little pointy edge. Ta da! A mini envelope!

To finish the card, I stamped the "you & me" from Perfect Pennants, then matted it on a tag from the Tag Topper punch. The Love border is hand-drawn--also unlike me. :-) The hearts are from the photopolymer set Countless Sayings, and the texture on the card base is the Sale-a-bration embossing folder, Decorative Dots.

To view or purchase the items used to make this card, click the links below:


Friday, February 14, 2014

Life doesn't have to be perfect


Just wanted to finish out the details for this card. You can see the bow tutorial here and the accompanying gift bag and card holder tutorial here.

The base of the card is Coastal Cabana, with a 5 1/4" x 4" layer also of Coastal Cabana, embossed with the new Scallops Embossing Folder. I used the Banners Framelits to cut the 3 layered pennants, and the matching set Perfect Pennants for the greeting.

Hope you're enjoying your Valentines Day! It's the perfect day to tell someone you care about them--even if it isn't a romantic relationship!

Click the links to view or purchase the items used on this project: