Translate

Thursday, February 27, 2014

Celebrate the chocolate!

These cute little candy holders hold 1 Ghiradelli square of chocolate. What a fun way to dress up a little treat!

Simple to make, too! Cut your cardstock 5 1/2 x 2. Score at 2 5/8 & 2 7/8. Punch the ends with a Tag Topper Punch--either Angled or Scalloped. Decorate!  These use the Sale-a-bration Designer Series Paper Sweet Sorbet and the Starburst Sayings Bundle. A few scraps of ribbon and twine, and they're ready to give away--or keep. :-)

Click the links below to view or purchase:


Product List
134818s
131298s
133521s
131176s
133324s
133522s
130021s
126877s
130911s

Tuesday, February 25, 2014

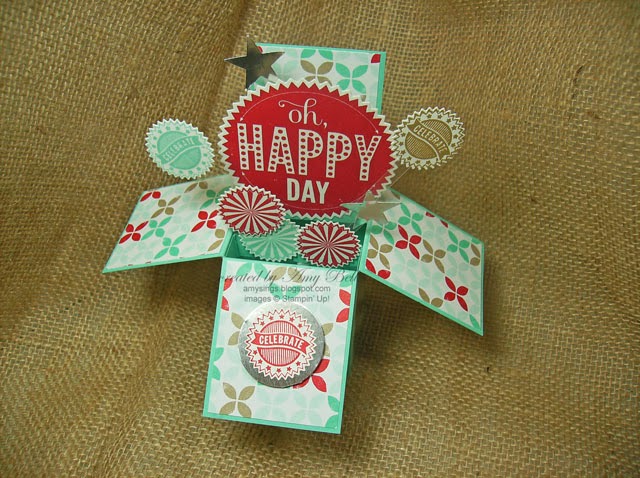
Happy Day Card in a Box


We made this card-in-a-box with the Starburst Sayings bundle at Club last week. There are tutorials all over the internet, and I sort of combined a few. :-) I wanted one that would fit in a standard A2 envelope, so I started with the cardstock 8 1/2 x 5 1/2. We scored at 2, 4, 6, and 8 on the long side, then turned and scored at 2 3/8. Heather Summers has a great tutorial here.

Here is how the card looks folded, ready to go in an envelope. You can see a couple little elements peeking out!


These cards are pretty simple to put together, even though they look complicated! I hope you'll give one a try!

Click to view or purchase items used on this card:

Thursday, February 20, 2014

Painter's Tape Birthday


We will be making this card tonight at my Stamp Club meeting. It was inspired by several cards I saw on Pinterest by Janine Rawlins of Australia. It's an easy and fun technique--just use strips of painter's or masking tape rubbed into ink pads, then press onto the cardstock. It makes a great background, and it doesn't require a lot of materials!

I'm loving that Hardwood background stamp! I wasn't going to buy it, but I've seen so many lovely samples, I couldn't resist.


Tuesday, February 18, 2014

A little envelope full of love


I've mentioned before that I'm trying to better at leaving love notes for my sweet husband. Our lives are so busy, we don't get to tell each other the sweet little things as much as we want to. This card started out with the tiny envelope! Another demonstrator asked for suggestions on how to make an envelope that would fit on a card front, and somehow my brain wouldn't rest till I figured it out. Which is a little odd for me, frankly. My brain tends more to words than numbers.

Anyway, to make a mini-envelope that is 1 7/8" x 1 3/8, start with a square of cardstock or Designer Series Paper (DSP) that is 3" x 3". Place it in the Envelope Punch Board at 1 3/8" and punch and score. Continue on by lining up the score line with the little pointy edge. Ta da! A mini envelope!

To finish the card, I stamped the "you & me" from Perfect Pennants, then matted it on a tag from the Tag Topper punch. The Love border is hand-drawn--also unlike me. :-) The hearts are from the photopolymer set Countless Sayings, and the texture on the card base is the Sale-a-bration embossing folder, Decorative Dots.

To view or purchase the items used to make this card, click the links below:


Friday, February 14, 2014

Life doesn't have to be perfect


Just wanted to finish out the details for this card. You can see the bow tutorial here and the accompanying gift bag and card holder tutorial here.

The base of the card is Coastal Cabana, with a 5 1/4" x 4" layer also of Coastal Cabana, embossed with the new Scallops Embossing Folder. I used the Banners Framelits to cut the 3 layered pennants, and the matching set Perfect Pennants for the greeting.

Hope you're enjoying your Valentines Day! It's the perfect day to tell someone you care about them--even if it isn't a romantic relationship!

Click the links to view or purchase the items used on this project:


Monday, February 10, 2014

Love is golden


Another "love" card! I think this works as an anniversary card as well as a valentine, don't you? No stamping here, but lots of die cutting and Washi tape!


What do you give your sweetheart for Valentine's Day?

Click the links to view or purchase the "ingredients" for this card:


Friday, February 7, 2014

Good as gold, by Madelyn


My daughter Madelyn helps me with my stamping business. She takes the photos and encourages me and helps out at Club. She made this beautiful card with some of the lovely gold products Stampin' Up! is featuring. Isn't it great!!!


Wednesday, February 5, 2014

Put a bow on it!


I promised more information on how to complete Monday's project.  First, let's talk about that cute bow! It's made with the Envelope Punch Board, as I mentioned on Monday. You can make your bow any length, but the width needs to be at least 1 inch for these instructions. I cut a 1 inch x 12 inch piece of Designer Series Paper (DSP) and divided it up: 1 x 6, 1 x 4, and a piece 1/4" x about 1 inch. 

Beginning with the 1 x 6, place it into the Envelope Punch Board at 3 inches and punch. Flip it over and repeat. This will be the center where your bow pieces will meet up. Round all 4 corners. Bring the ends to the middle--you'll see where they match up with the rounded parts of the center--and adhere them with glue dots.

Next, on the 1 x 4 piece, place it into the Envelope Punch Board at 2 inches, punch, then flip and punch again. Put each short end (the 1 inch side) into the punch, centering as much as possible, and punch to "flag" the ends. This is the "ribbon" piece that will go under the bow.

Place the "bow" on the "ribbon," wrap the 1/4 inch piece around it to hold it together, and adhere it all with a final glue dot. Ta da! You've made a bow! And since you already needed the Envelope Punch Board for boxes (here and here and here) and file folder cards and envelopes, it's like the bow projects are FREE! :-)

Hope you enjoyed these instructions--I'd love to see projects you make with these bows! Post a link in the comments!


Monday, February 3, 2014

How to fix up an old bag

Not me--a gift bag!

I have lots of plain gift bags in my stash, but I have a hard time decorating them and then liking how they look. (Click on the picture to see a close-up.)

We made this gift bag with card and card holder at Club last week. Lots of fun things going on for this project! First--the card holder:


We started with a strip of Real Red Coredinations cardstock that was cut at 5 1/2 x 2. It fits perfectly into the Scalloped Tag Topper Punch, so we punched both ends. Then we cut a line from tag hole to tag hole--I used a paper cutter, because that's the only way I can approximate a straight line. :-) Decorate tag and adhere the TOP ONLY to a gift bag. It's a perfect way to display your gorgeous card and decorate the gift bag all at once!

The arrow die cuts are from the Label Flip Card Thinlit set, but you could use a stamp or any embellishment that suits your project.

Later this week, I'll show you how we made the darling bow (hint: with the fabulous Envelope Punch Board!) and the rest of the card.

Click below to view or purchase products used to make this project: